Tests with Mountains and Environment

30 04 2013

Needed research

Before continuing with the development of my project, there is a thing I had to research. My animated short is full of mountains, but I’ve never done mountains in 3D, so I’ve done lots of research in order to see how to do good 3D mountains and test which is the best style for the mountains of my short. At the beginning, I started doing some tutorials about realistic mountains.

monataintest6

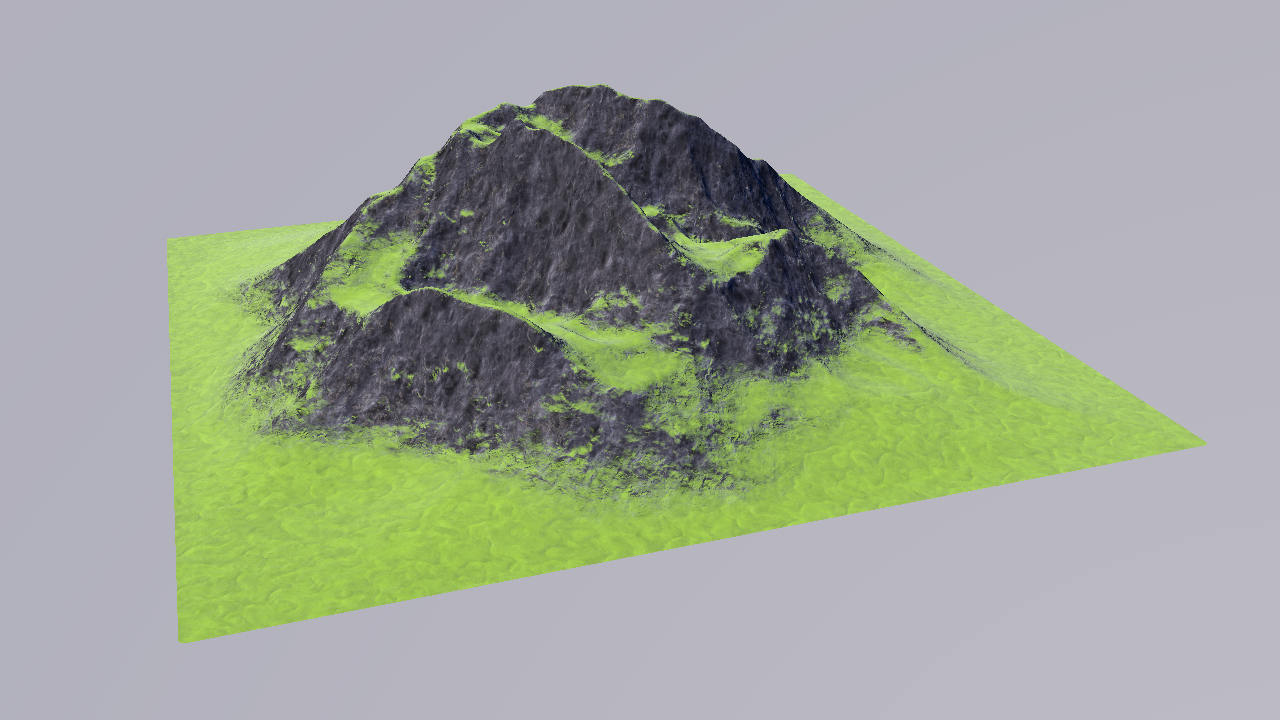
This mountain is based on different layers of noises applied to a displacement map, it also have bump mapping and other effects. It includes some gradients in order to make the grass appear just in some areas of the mountain.

After learning the basics of doing mountains, I’ve created a basic scene for the castle surroundings in order to make different tests.

castle5_global_7_2

I applied the different materials to the scene, but the result was not the one I was expecting:

castle_global36

I started tweaking the parameters, but the result was too realistic for the cartoon style I am looking for:

Sin título 23 Sin título 25 Sin título 24

Then, I started to test different artistic shaders, but with the basics I’ve learnt from the tutorials, this are the art shaders I’ve done and used:

metalgreeenvase

castle_global31

I like much more this first results with the art shader combined with the basics of creating mountains. It matches a lot more the art and cel shader style I’m looking for my animated short. But it still need to improve. So I started tweaking with the art shader applied to a fractal modeling form:

monataintest2 monataintest3 monataintest4

After some tests, I’ve realized that displacement maps aren’t necessary for the style I’m looking for. Because increases the render time a lot, and it doesn’t make a real difference. So I’ve tried and applied different noises with bump mapping. This is the result after tweaking with the parameters, the noises, bumps, specular, etc.

monataintest5

That’s the style I was looking for my mountains, kind of cartoon but realistic at the same time, with brush style texture thanks to the art shader. It fits perfectly the  general style of the short.

So I’ve remodeled the scenario, with more fractal mountains. This is a picture of the process:

castle_global6

And this is the result:

castle_global7333

As the background of the physical sky was not to my liking, I’ve painted a background sky in ArtRage and I’ve applied it to a background object in C4D. With this sky the scene looks better and it fits better the style of the short. The castle is not textured yet.

Sometimes it’s good to stop a few days to research for the things I need to know in order to finish the project. Then, the workflow of the production is going to be tidy and efficient. 


Creative Futures – Week XI

27 04 2013

Keep working

Here is the progress of the week on the different projects:

Pirates Videogame:

This week we’ve been doing lots of testing with the different levels of the game. We played and re-played each level in order to see that all works ok. We also started to develop the hard mode of the game. In this hard mode, you have less time to beat the level. We want to create a challenge, this hard mode is addressed to people that plays games usually.

We have done lots of tests in order to adjust the time for each level, in this mode we want to make each level difficult to beat. So this week I haven’t so much material to show, because nearly all the improvements we’ve done are about playability.

I have also designed the 4rth level, we are still working on the moving platform, but I’ve done the design anyway.

level4design

We have modified the Jump of the character also, after lots of researching, Sergi managed to apply the jump animation. Also now the jump is limited, if you fall of a platform, you can’t jump until you hit the floor. We’ve also added a new feature, when you jump, if you push the down key,  you can increase the falling speed of the character, this is a feature for experienced players, and you have to use it in some areas of the hard mode if you want to beat the game. Here is a little video I’ve done showing all the improvements in jumping:


As you can see, this is a part of the 2nd level in hard mode. You have only 8 seconds to enter the door. It’s difficult, but it’s possible. As I said, you have to press the down key in order to fall rapidly and beat the level.

We are now working on the first boss battle level, it’s almost finished, but we still have to do some arrangements.

—————————————-


First Scene Rough Test

22 04 2013

Setting the style/animation

Recently I’ve been doing some tests with 2D characters in order to see look how all works. After doing some tests I’ve concluded that my project is going to look better with 2D characters. I’ve got more experience designing 2D drawn characters, so I think with this technique I can focus a lot more on the expressions, the performance, the artistic aspect of the short, and the quality of it.

I prefer to achieve a quality product, rather than put a lot of effort into the technical part obtaining a poor result. I want an equilibrium between art and technique. So I think the combination of 3D scenarios and objects with 2D characters, with the form of a visual novel, is the perfect way to achieve that. Also it makes my project kind of singular.

This is the main test I’ve done. It’s the first scene of my short (after the book scene explaining the legend). As you can see, the drawings are so sketchy, is not the final look of the short but it’s a nice test to show the basics and the mechanics that my animated short will have from now on.

Today I had another meeting with David Minguillón, our animation teacher here in Spain. I’ve been showing him the test, and we’ve talked about the development of the short.

As I’ve concluded after the meeting, I’m going to do my animation based on the “main frames” of each movement, the keyframes of the movement. Just the same way I’ve done in the test. I’ve got to focus the animation only in the necessary elements. Not to put animation if it’s not necessary to the scene/element.

I have 3D scenarios, so I can take advantage of them. We have reviewed the entire animatic, and there are some scenes that would look great with camera movements through the 3D environments. I want to play with the 3D camera and the 2D characters in the most exciting scenes of the short in order to give life and movement to this characters with a little number of animated frames.

Also I can play a lot with layers, depth of field, as the basics of a visual novel/comic in movement.

Now I’ll be working on creating this same test scene with the final and definitive look for the short. After doing that, I will do the entire layout for the complete short with camera movements and definitive shots, that will be in 3D so I will use all this for the final production. Here is what I’ve got to do now:

  1. Create the test scene with the final and definitive look for the short.
  2. Do The complete Layout for the short.
  3. 3D modeling of all the scenarios of the short.
  4. Drawing all the characters through all the short.

I‘ve got the basic 3D forms of the scenarios, so that will be perfect for the layout. With all this planned all I’ve got to do is work a lot and do my best!


Creative Futures – Week X

20 04 2013

Working Hard

This week I’ve been working hard to finish and improve some aspects of the Pirates Videogame.

Pirates Videogame:

We’ve been designing the different levels of the game. Sergi had assembled the levels with the platforms and everything, and I’ve done the designing.  I’ve also done some improvements in the two final levels, and I’ve tested that all the platforms works fine, sometimes the main character gets stuck into the floor, and that is due the assembling of the platforms. I’ve solved those errors but we have to work more on the platform assembling in order to get the level work perfectly.

Sergi had programmed some showers, and I’ve improved them changing the timing and adding the animation. Here is some caps of the different levels. Level 4 is not present because we have some problems with a moving platform, and I’m not designing it until it work ok.

We have changed the jumping of the main character, so we had to re-design all the levels we have in order to make him reach the platforms (now he jumps less high).

You start at the bottom of the boat, on the darkest rooms:

Level 1:

Level1_cap

Level 2:

Level 2_cap

Level 3:

In this stage you can found some standing water, if you fall into the water you loose one life.

Level3_cap

As you can see, as you advance through the levels, you go up in the boat, so the stages become clearer and cleaner.

Level 4: The 4rth level is under construction.

Level 5:

In this level you can see the water showers, if you touch the water you loose one life (yes, in this game water kills you).

Level5_cap

Level 6:

Level6_cap

And that’s all by now.

Here is the shower animation. The animation consist in two different frames of water, in each position the frame is altering (1 -2 – 1 – 2) and falling down. Here are the two frames that form the animation:

ducha_plus2

And here is the animation itself:

ducha_plus

I’ve also done the bottom part, where the water splashes (it also kills you), it consist in two frames:

charco_export

I’ve designed also the water supplier, with the copper esthetic of all the mechanical elements of the game:

duchasurtidor copy

And this is how all fits together:

showers

I’ve made a video to show the showers in movement:

We are working now on level 4, and  on polishing the level structure and designing. Soon we will start to develop the different scenes and intro. We have also to work on the two different bosses of the game.

—————————————-


Castle Library 3D Modeling

13 04 2013

Enjoying the process

This past weeks I’ve been modeling some stuff (scenario + character) for doing the first animation tests. Modeling the scenes it’s being easy as modeling characters, because there’s only few things I have to research and learn.

I’ve been modeling the first scenario, “Castle Library”, with all the objects and furniture. Although it’s not the final definitive version, it’s quite definitive.

Castle_Library_6

Here is the Library with a clear lighting:

clearrender

And here are some detail renders of the most elaborate elements I’ve been modeling:

The stool:

silla7

The furniture with the old past king I’ve designed (is the grandpa of Prince Ewan, and the father of the actual King).

mueblecuadro9

The table:

Table5-d

The cupboard:

mueblearmarios4

The shelf:

estanteriapatas4

The bookshelves:

Estante Libros3

The chest:

baul6_c

The closet:

armario5_c_deco_a

Various table objects:

table objects

All the objects are texture with the “Art/Artistic Shader” I analyzed on my Dissertation, I thought is perfect for the pictorial result I’m looking for my short style. I’ve painted so many textures, here are some examples:

greeenvase wood_dark texturetaburet

I’ve also done some specific textures in order to decorate different elements (the cupboard, the vase) Here is one example:

decovase


With this I will do some animation tests in order to define how will be the final look and style of my short. Then, I will continue modeling the rest of the short scenes.


Keira 3D Modeling

13 04 2013

+ Learning how to do Clothes and Hair

This past weeks I’ve been modeling some stuff (scenario + character) for doing the first animation tests. This was a very hard work, because I had to learn for myself how to do clothes, eyelashes, and hair. All applied to the Character.

I had quite experience modeling bodies and cartoon faces (so that’s not the difficult part for me), but I haven’t any experience on clothing. Also I had very few experience with real hair. So it was quite a research process in order to learn how to do some things.

I’ve been modeling the main character of my short, Keira. Although I like the result, I didn’t dominate the technique, so I don’t have the same ease as when I design 2D characters. That’s making me doubt about of how I’m going to do the characters form my short (in 3D or in 2D).

As I’m doing some kind of graphic novel, maybe I don’t need 3D characters. Make a 3D character is an immense work, and I think I haven’t the same ease that I have when designing 2D character. I realized of all that when designing Keira in 3D. This is the final 3D modeling with hair, eyelashes, texturing, and clothes:

keira3Dfinal

And here is a turntable of the final 3D modeling/design of the character I’ve done:

So I had a lot of problems with the clothes, because I’ve never done this before. I’ve saw and read lots of tutorials. I’ve done a lot of tests and finally I’ve got some results. Doing real clothes with physics is really hard. There are a lot of little problems that appears when doing the clothes, and it’s very hard to get all working perfect. Also, is very difficult to achieve an specific form.

I’ve starting modeling the Head of Keira from the side and front designs/views I’ve done. I’ve put the views in the 3D program and I’ve started modeling, once I had a head that I’ve liked, I started modeling the body also from the design views.

frontview sideview

First I was doing the 3D design with the exact form of the original drawn design. But then I had to adapt some parts into the perspective view (in order to make it look proportionate and good looking in 3D). The texturing of the body is done with “Art Shader”, as I said on my Dissertation some months ago, I drawn the texture/material on ArtRage, and then I import it in the 3D software in order to use as an Art Shader texture.

This are some of the textures/materials I’ve drawn:

lips_testskin_firsttest texturedress

This is the Dress pattern I’ve done in order to apply the cloth physics, I’ve done a lot of failures, this was mostly the tenth attempt to do it, and the good one:

dresspattern

This is the dress, adapted to the body with the Dress-O-Matic function of Cinema 4D, it’s also textured:

clothtext1

And this is the dress relaxed, I’ve attached the top of the dress to the body with a belt tag (also here I had done lots of versions until it worked). The skirt part is relaxed. Arrive to this result has taken me a lot of work, it has been very difficult to work with the cloth dynamics in order to make all work perfectly.

clothrelaxed2

Finally, I combined the cloth with a NURBS Cloth object (for make the cloth thicker), and a Nurbs Object (for smothing the mesh). I’ve also applied a nurbs object to the body mesh, etc.

I had also research for tutorials in order to learn how to do eyelashes, is similar to hair, so it wasn’t so difficult. Eyelashes doesn’t need dynamics so they are easier to shape.

eyelashes

I had some problems with the hair of the head itself. It is very difficult to control hair and get the appropriate shape. I practiced this before but it was difficult too. Is really hard to get the dynamics of the hair work as you want, but finally I get it. This is a Hair test I’ve done with an older version of Keria’s face modeling:

You can’t transfer a Hairstyle from one Hair object to another because it is attached to the head. It releases the attachments when working with symmetry modeling. So I’ve made the final hair another time in the final model (but you can transfer the hair properties, so I did).

capturapelo

Here is a capture of the side view, with the 2D reference design at the background:

sideviewhair

And here a full body render of the final version:

finalmodel

And after all this hard work, I don’t know if doing the characters in 3D is the appropriate way for my short. I will be doing tests with 2D hand drawn characters combined with the 3D backgrounds I’m modeling. I will do the tests in order to see how the final production will look, and I will choose the best option basing on visual results.

I’ve learned a lot doing this model, so it worth the effort.


Creative Futures – Week IX

13 04 2013

Progressing

Finally many of the projects are coming to their end. I have gone to the “Animac” Animation Festival, and the work with the wedding Cards is now finished. The Pirate Game is now in full production process and the UAB project is stopped by the moment.

UAB Project:

Due to the facts I’ve commented in past entries, and the fact that all the members of the project are very busy with the degrees final project. This is being stopped. As I said on the beginning of my Creative Futures entries, this is a very huge project, so it’s going to be retaken in the future (near future, but maybe out of the creative futures dead line). We have to met with UAB people in order to plan the project for the near future.

—————————————-

Pirates Videogame:

This Thursday we have met (Sergi and I) with Premia people, in order to show them the final beta/demo version of the game. It’s been a long time without meeting, but we have lots of improvements.

They really like the demo, and they were quite amazed by the results. They have seen some improvements as the water marker, the lives marker, the animation when the cat gets hurts, all they have requested is working now.

They liked a lot the lever and the timer, they said is a very nice idea in order to improve the playability of the game. They also like the in game design of the level, the enemies, and the different objects. They really like how all mix together.

They commented us if we can modify the physics of the Cat, they thought that the Cat jumps too much high. They want a shorter and heavier jump. We we’ll improve that aspect.

They also commented us about the “stops” that all the platforms have. We have done that in order to make the enemies stay walking in one single platform. They told us that if we can solve that, it will be great, but it’s not something so bad. They proposed to make this “stops” to only affect the enemies and not the main character. We will work on that also.

They commented us that they have been reviewing the story and the level development. They want the game to be shorter. So we propose and arrive to this new structure:

  • 1rst level: 2 stages.
  • 2nd level: 2 stages.
  • 3rd level: 2 stages.
  • 4rth level: 1 boss.
  • 5th level: Final Boss.

The two bosses will have different physics. The first boss will consist in avoid the cannonballs he throw to you, and the second boss (and final boss) will be on melee mode.

We commented them that we have thought in a lot of different elements and new challenges like water moats, showers, water beams, etc. We want to put that new elements on the next levels, and they liked the idea. They thought it will give variety to the game.

For closing the meeting, they commented us that they are really happy with the results. We are quite busy with the other projects, so we didn’t specify a fixed day for the meeting. We agreed that we will met when we have the design and programming of the next levels done.

And here is the video of the demo/beta, with some of the designed enemies, the lever, and the new timer we designed in order to show the time you have before the door closes:

—————————————-


Creative Futures – Week VIII

6 04 2013

Working Hard

Well, past week we were on Easter holidays so I took a little break because from now on there’s going to be a lot of work to do for finishing the different projects.

3D Wedding Cards:

Well, as I said on previous posts, I’ve done a last work about the wedding cards. This time I’ve work in two different triptychs, one horizontal triptych, and one vertical triptych. As I said, I’ve developed a new list of prices, with different prices for each scene and  type of card. With this list, the negotiation was a whole better than the last time, and without  any  surprise. I learned that is very important to have planned this details in order to be prepared for any change or request. This time they only wanted the files, they don’t ask me about renders so I’ve done the modelings and scenes and I’ve delivered them the files. I’ve done one example render for each scene in order to let them know how the final result looks.

These are the new triptychs I’ve done, with watermarks and sample textures I’ve created specially to upload them to the blog:

Vertical Opened Triptych:

verical_abierto_watermark

Vertical Closed Triptych:

Vertical_cerrado_watermark

Horizontal Opened Triptych:

horizontal_abierto_watermark

Horizontal Closed Triptych:

horizontal_cerrad_watermark

And that’s the end of this project, they are very satisfied with the work and the results, they were in a little hurry for this second batch and I’ve done the work in a short time so they liked. They said that in the future they probably will contact with my, but by the time it’s all done.

That’s been a great experience, also because it has been my first 3D job paid. We have met several times, but the communication was always good, and I’ve understood quite well all the requests they have made to me. They been always available in order to attend my doubts about the design by e-mail, and they also made me a bunch of requests by e-mail. The use and the communication by the FTP to upload them the archives was also very effective. I had experience with FTP in the past so it wasn’t difficult to me.

I’ve been a little pushed about deadlines because I’ve stop doing all the other projects in order to accomplish the data for this work, because the other projects had distant deadlines. This has been a real professional project so accomplish the deadlines with good results is essential and very important because if you work well you have  a lot of possibilities of being contacted in the future for new batches of job. Also if you’ve done a good work they can recommend you to other enterprises or people in the field.

The most difficult part was the part of setting prices, and put a prices to your own work, is very difficult to value your work, you have to decide if charge per hour, per work, or per product. That’s why I made research throughout the web and asked to my teachers here in Spain. I suppose that this is a problem that normally people have in their first jobs, I hope that with some experience this will become easier. It’s difficult because you never know which problems the job is going to take.

But overall it has been a very enriching and good experience.

—————————————-

Pirates Videogame:

Due to Easter Holidays we have delayed the meeting with Premia people, also Sergi was working  on his Primaroca Project so the meeting finally will be next week, they have to confirm us if it’s going to be on Thursday or Wednesday.

I have been working on the enemies of the game, and I’ve done a whole bunch of animations based on the enemies I’ve designed and uploaded in older entries:

The Wolf Pirate:

stand_bad01_blog

Bad_guy_WALK

The Frog Pirates:

stand_frogs_blog

Bad_guy_FROG4_WALK Bad_guy_FROG3_WALK Bad_guy_FROG2_WALK Bad_guy_FROG1_WALK

For this one I’ve done different versions with different colors. With all this versions we can repeat the enemy in the same stage several times and it will look great without feeling repetitive.

The Falcon Pirate:

stand_falcon01_blog

Bad_guy_FALCON_WALK

The Pig Pirate:

stand_PIG01_blog

Bad_guy_PIG_WALK

The Monkey Pirate:

stand_monkey01_blog

Bad_guy_MONKEY_WALK

With all these enemies the demo will look amazing and varied. This week we will show them the demo, once they confirm us all is ok, we will go ahed with the rest of the levels of the game and designing the story scenes.

—————————————-