VImeo URL
Here is the link to my final project, ready for the assessment!:
VImeo URL
Here is the link to my final project, ready for the assessment!:
Planning
This is what I expect to do this month in Wales:
I haven’t got to much 3D rendering to do so I will render during the progress, I don’t need specific week for rendering.
Working here in Wales is going to decrease the quality of the project, in Spain I had several computers which are enough powerful to handle the project, also I had big screens to work properly. Here the computers are not enough powerful and almost all the time I have to work with my laptop, which isn’t powerful and has small screen and resolution.
I was working to much comfortably and flawlessly in Spain, but here no.
Definitely these aren’t the conditions to handle a project of this magnitude. I will try to do my best with the tools I have here.
Advanced Layout Finished
Here is my advanced layout finished. I’ve done all the drawings and all the editing. As you can see the drawings have flat colors and are a bit sketchy. Also some 3D scenarios need to improve.
Tomorrow I’m leaving to Glyndwr, so now I’m transferring all the files needed to work there. I’m doing all the 3D part of my short with Cinema 4D, and I don’t know what is going to happen because in Glyndwr there is no C4d. I have to do some work with C4d in order to finish my project, and my laptop is not powerful enough to handle this work flawlessly, so I don’t know what’s going to happen.
Transfer a great project such this when is in the final part of the development is really a huge mess. A big project It’s enough hard to do when all is ok, so with messes like this all the things gets quite harder.
Now I’m not really enthusiastic about all this because it’s going to represent lots of headaches in order to complete the project as I expected.
Here is a list of what I’ve got to do now in this last month in Wales:
Really helpful Book
I’ve bought this book on Christmas and It has helped me a lot for doing all the drawings of my project: specially with the walking animations and the information about the Horses and other animals. Horse poses are extremely difficult to do without reference (if you haven’t done it before) so it has been a great help.

It’s a really nice book and I’m sure I will continue using it lots of times in the future.
Working Really Hard
These weeks I’m being really busy working on my final project. It’s a non-stop working. As the animation in my project is based on 2d layer movements over 3D environments, my layout is becoming nearly in what will be the final animation.
I mean, when doing the layout, I realized that every scene was approaching to it’s final result. Except for the modelings (some things are definitive, but some things need to improve) and the characters (now they are sketches) every shot, animation and camera movements is almost definitive. That’s why I called “advanced layout”.
All the external modelings (referring to the kingdom) are done, and nearly definitive. I’ve also made some trimmings on the last part of the short, as the teachers in Glyndwr said to me last year. There’s no time to produce the whole original storyboard/animatic. Fortunately the plot isn’t being affected by this trim.
So, in summary, my advanced layout will only need an overall improvement over modelings and drawings, to become the final result. Also I expect to correct a few shots and movements when reviewing this advanced layout finished.
I expect to finish this advanced layout in a few days, but maybe it will take a bit longer.

Needed research
Before continuing with the development of my project, there is a thing I had to research. My animated short is full of mountains, but I’ve never done mountains in 3D, so I’ve done lots of research in order to see how to do good 3D mountains and test which is the best style for the mountains of my short. At the beginning, I started doing some tutorials about realistic mountains.
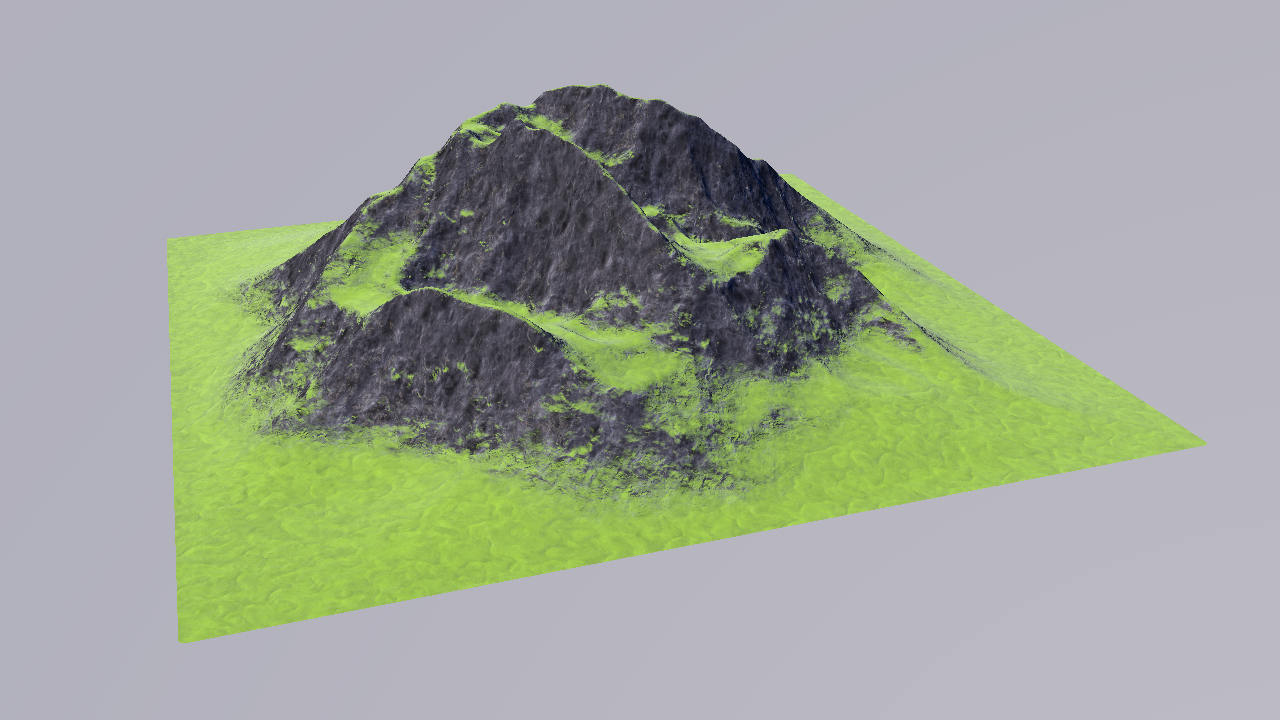
This mountain is based on different layers of noises applied to a displacement map, it also have bump mapping and other effects. It includes some gradients in order to make the grass appear just in some areas of the mountain.
After learning the basics of doing mountains, I’ve created a basic scene for the castle surroundings in order to make different tests.

I applied the different materials to the scene, but the result was not the one I was expecting:

I started tweaking the parameters, but the result was too realistic for the cartoon style I am looking for:


Then, I started to test different artistic shaders, but with the basics I’ve learnt from the tutorials, this are the art shaders I’ve done and used:


I like much more this first results with the art shader combined with the basics of creating mountains. It matches a lot more the art and cel shader style I’m looking for my animated short. But it still need to improve. So I started tweaking with the art shader applied to a fractal modeling form:


After some tests, I’ve realized that displacement maps aren’t necessary for the style I’m looking for. Because increases the render time a lot, and it doesn’t make a real difference. So I’ve tried and applied different noises with bump mapping. This is the result after tweaking with the parameters, the noises, bumps, specular, etc.

That’s the style I was looking for my mountains, kind of cartoon but realistic at the same time, with brush style texture thanks to the art shader. It fits perfectly the general style of the short.
So I’ve remodeled the scenario, with more fractal mountains. This is a picture of the process:

And this is the result:

As the background of the physical sky was not to my liking, I’ve painted a background sky in ArtRage and I’ve applied it to a background object in C4D. With this sky the scene looks better and it fits better the style of the short. The castle is not textured yet.
Sometimes it’s good to stop a few days to research for the things I need to know in order to finish the project. Then, the workflow of the production is going to be tidy and efficient.
Setting the style/animation
Recently I’ve been doing some tests with 2D characters in order to see look how all works. After doing some tests I’ve concluded that my project is going to look better with 2D characters. I’ve got more experience designing 2D drawn characters, so I think with this technique I can focus a lot more on the expressions, the performance, the artistic aspect of the short, and the quality of it.
I prefer to achieve a quality product, rather than put a lot of effort into the technical part obtaining a poor result. I want an equilibrium between art and technique. So I think the combination of 3D scenarios and objects with 2D characters, with the form of a visual novel, is the perfect way to achieve that. Also it makes my project kind of singular.
This is the main test I’ve done. It’s the first scene of my short (after the book scene explaining the legend). As you can see, the drawings are so sketchy, is not the final look of the short but it’s a nice test to show the basics and the mechanics that my animated short will have from now on.
Today I had another meeting with David Minguillón, our animation teacher here in Spain. I’ve been showing him the test, and we’ve talked about the development of the short.
As I’ve concluded after the meeting, I’m going to do my animation based on the “main frames” of each movement, the keyframes of the movement. Just the same way I’ve done in the test. I’ve got to focus the animation only in the necessary elements. Not to put animation if it’s not necessary to the scene/element.
I have 3D scenarios, so I can take advantage of them. We have reviewed the entire animatic, and there are some scenes that would look great with camera movements through the 3D environments. I want to play with the 3D camera and the 2D characters in the most exciting scenes of the short in order to give life and movement to this characters with a little number of animated frames.
Also I can play a lot with layers, depth of field, as the basics of a visual novel/comic in movement.
Now I’ll be working on creating this same test scene with the final and definitive look for the short. After doing that, I will do the entire layout for the complete short with camera movements and definitive shots, that will be in 3D so I will use all this for the final production. Here is what I’ve got to do now:
I‘ve got the basic 3D forms of the scenarios, so that will be perfect for the layout. With all this planned all I’ve got to do is work a lot and do my best!
Enjoying the process
This past weeks I’ve been modeling some stuff (scenario + character) for doing the first animation tests. Modeling the scenes it’s being easy as modeling characters, because there’s only few things I have to research and learn.
I’ve been modeling the first scenario, “Castle Library”, with all the objects and furniture. Although it’s not the final definitive version, it’s quite definitive.

Here is the Library with a clear lighting:
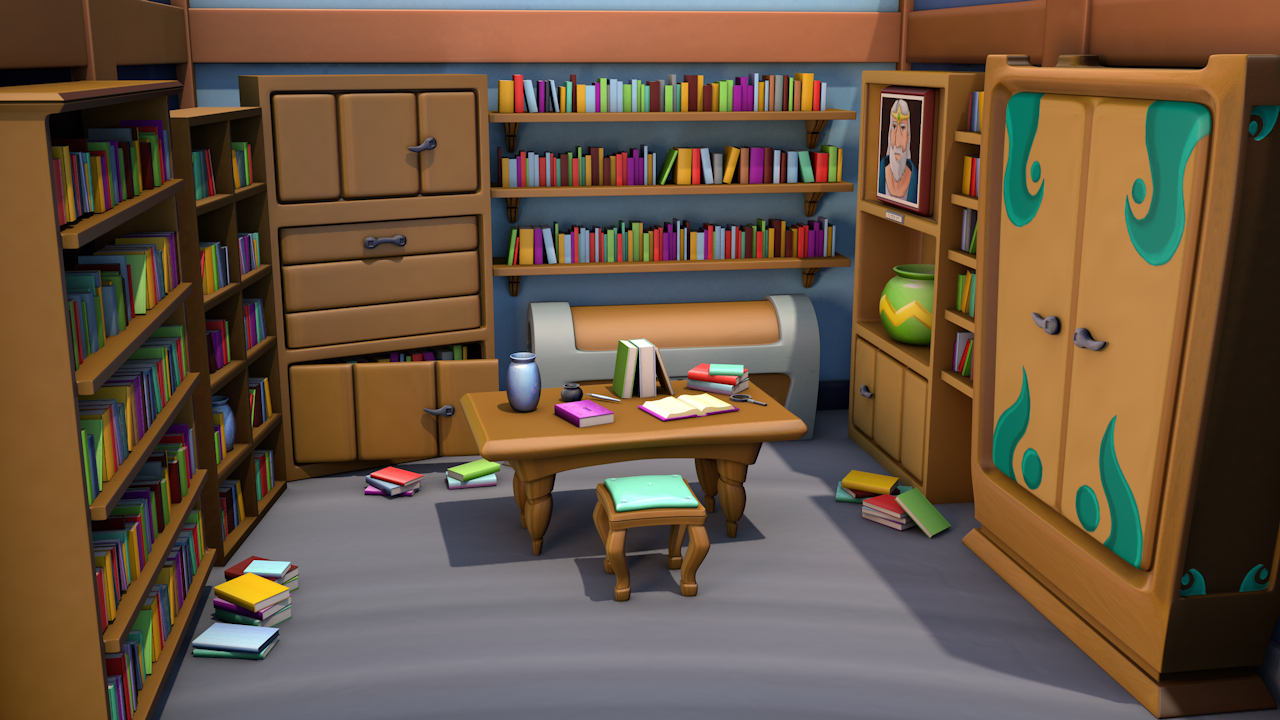
And here are some detail renders of the most elaborate elements I’ve been modeling:
The stool:

The furniture with the old past king I’ve designed (is the grandpa of Prince Ewan, and the father of the actual King).

The table:

The cupboard:

The shelf:

The bookshelves:

The chest:

The closet:

Various table objects:

All the objects are texture with the “Art/Artistic Shader” I analyzed on my Dissertation, I thought is perfect for the pictorial result I’m looking for my short style. I’ve painted so many textures, here are some examples:


I’ve also done some specific textures in order to decorate different elements (the cupboard, the vase) Here is one example:

With this I will do some animation tests in order to define how will be the final look and style of my short. Then, I will continue modeling the rest of the short scenes.
+ Learning how to do Clothes and Hair
This past weeks I’ve been modeling some stuff (scenario + character) for doing the first animation tests. This was a very hard work, because I had to learn for myself how to do clothes, eyelashes, and hair. All applied to the Character.
I had quite experience modeling bodies and cartoon faces (so that’s not the difficult part for me), but I haven’t any experience on clothing. Also I had very few experience with real hair. So it was quite a research process in order to learn how to do some things.
I’ve been modeling the main character of my short, Keira. Although I like the result, I didn’t dominate the technique, so I don’t have the same ease as when I design 2D characters. That’s making me doubt about of how I’m going to do the characters form my short (in 3D or in 2D).
As I’m doing some kind of graphic novel, maybe I don’t need 3D characters. Make a 3D character is an immense work, and I think I haven’t the same ease that I have when designing 2D character. I realized of all that when designing Keira in 3D. This is the final 3D modeling with hair, eyelashes, texturing, and clothes:

And here is a turntable of the final 3D modeling/design of the character I’ve done:
So I had a lot of problems with the clothes, because I’ve never done this before. I’ve saw and read lots of tutorials. I’ve done a lot of tests and finally I’ve got some results. Doing real clothes with physics is really hard. There are a lot of little problems that appears when doing the clothes, and it’s very hard to get all working perfect. Also, is very difficult to achieve an specific form.
I’ve starting modeling the Head of Keira from the side and front designs/views I’ve done. I’ve put the views in the 3D program and I’ve started modeling, once I had a head that I’ve liked, I started modeling the body also from the design views.


First I was doing the 3D design with the exact form of the original drawn design. But then I had to adapt some parts into the perspective view (in order to make it look proportionate and good looking in 3D). The texturing of the body is done with “Art Shader”, as I said on my Dissertation some months ago, I drawn the texture/material on ArtRage, and then I import it in the 3D software in order to use as an Art Shader texture.
This are some of the textures/materials I’ve drawn:


This is the Dress pattern I’ve done in order to apply the cloth physics, I’ve done a lot of failures, this was mostly the tenth attempt to do it, and the good one:

This is the dress, adapted to the body with the Dress-O-Matic function of Cinema 4D, it’s also textured:

And this is the dress relaxed, I’ve attached the top of the dress to the body with a belt tag (also here I had done lots of versions until it worked). The skirt part is relaxed. Arrive to this result has taken me a lot of work, it has been very difficult to work with the cloth dynamics in order to make all work perfectly.

Finally, I combined the cloth with a NURBS Cloth object (for make the cloth thicker), and a Nurbs Object (for smothing the mesh). I’ve also applied a nurbs object to the body mesh, etc.
I had also research for tutorials in order to learn how to do eyelashes, is similar to hair, so it wasn’t so difficult. Eyelashes doesn’t need dynamics so they are easier to shape.

I had some problems with the hair of the head itself. It is very difficult to control hair and get the appropriate shape. I practiced this before but it was difficult too. Is really hard to get the dynamics of the hair work as you want, but finally I get it. This is a Hair test I’ve done with an older version of Keria’s face modeling:
You can’t transfer a Hairstyle from one Hair object to another because it is attached to the head. It releases the attachments when working with symmetry modeling. So I’ve made the final hair another time in the final model (but you can transfer the hair properties, so I did).

Here is a capture of the side view, with the 2D reference design at the background:

And here a full body render of the final version:

And after all this hard work, I don’t know if doing the characters in 3D is the appropriate way for my short. I will be doing tests with 2D hand drawn characters combined with the 3D backgrounds I’m modeling. I will do the tests in order to see how the final production will look, and I will choose the best option basing on visual results.
I’ve learned a lot doing this model, so it worth the effort.
Description, Data and Designs
Finally I finished all the Scenario Designs, it has been a really tough work, because designing and drawing scenarios is not my best and it’s quite difficult to me. At the end I had to work at a fast pace to complete all the designs because I was dedicating more time than I expected. Doing the scene designs has helped me a lot to structure the world and the events of the short. Now I have all structured and all the designs ready to do the 3D models!

Here is the content of every Scene Design Sheet (with little variations in some of the Scenes):
1. Description & Data
1.1. Scale
1.2. Additional Information
2. Scene Design
2.1. Final Design
When doing the designs of the different scenarios, I realized that it was necessary to situate the different locations, in order to make a logical development of the plot. If I know where the different locations are, I can tell in which direction is going every character, and how long takes to him arrive from a place to another.
That’s why I’ve created the Kingdom Atlas, a map of the different locations that appears in the short. Also I added some locations that aren’t visible in the short, making the world consistent.

Here is a list of the final scenarios:

Here are the different PDF files download links of each Scenario Sheet, with designs, data and descriptions:
00_KingdomAtlas_scene_design
01_CastleLibrary_scene_design
02_CastleCorridors_scene_design
03_ThroneRoom_scene_design
04_TheCastle_scene_design
05_CaveAccess_scene_design
06_Knight’sCave_scene_design
07_KeiraKayleeHouse_scene_design
08_MineralMines_scene_design
09_HighMountainViews_scene_design
10_CastlePath_scene_design
11_CastleOutskirts_scene_design
12_TowerRoom_scene_design
Now I’m working on create a full scene of the short, in order to see how will look the final production. If it works, I will do the complete layout of the short, and I will start modeling the rest of the short elements.
